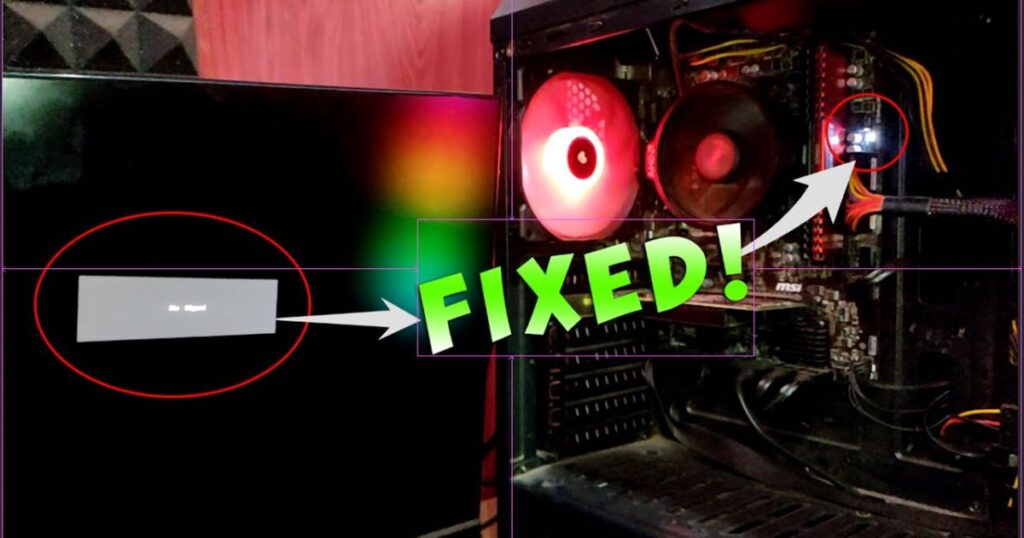
Seeing the VGA light turn on when starting up your computer is a reassuring sign that your graphics card and display are working properly. However, if this LED indicator on your motherboard doesn’t light up, it likely signals an underlying issue with the VGA (video graphics array) system. In this comprehensive guide, we’ll cover everything you need to know about troubleshooting a motherboard’s VGA light to get your display back up and running again.
What the VGA Light Signals
The VGA light is a light-emitting diode (LED) located on the motherboard that illuminates during the power-on self-test (POST) when booting up the computer. It indicates that the motherboard has detected a graphics card or video card installed and has initialized the VGA graphics system.
Here’s a quick rundown of what the VGA light signifies:
- On – The motherboard has detected the graphics card and initialized the VGA system correctly. The display should turn on.
- Off – The motherboard cannot detect the graphics card. There will be no video signal sent to the display.
- Flashing – Usually indicates a problem with initializing the graphics card or a system hardware error.
Having the VGA LED light up is the first step towards getting video output to your display. If it doesn’t turn on, the motherboard and graphics card aren’t communicating properly.
Why the VGA Light Matters
This small LED provides valuable diagnostic information for your PC. Here are some key reasons why a functioning VGA system is important:
- Video Signal – The VGA LED verifies that a video signal is being sent from the motherboard’s PCIe slot to your graphics card and display. Without this initialization, you’ll have no image.
- Hardware Detection – It confirms that the motherboard recognizes the graphics card. The VGA system must detect hardware like the GPU for video output.
- Boot Process – Illuminating the LED signifies the boot process has passed the VGA initialization stage. Issues may prevent POST from completing.
- Graphics Card Health – If the light flickers or won’t turn on, it often indicates a problem with your graphics card that needs to be addressed.
- Troubleshooting – It’s an early troubleshooting checkpoint. If the light doesn’t come on, focus your efforts on the VGA components.
So in summary, this essential LED light acts as both a status indicator and a diagnostic tool for the graphics card and video connectivity of your PC. When the VGA light doesn’t turn on, it should prompt further investigation.
Common Reasons the VGA Light May Not Be Working
There are a handful of potential culprits if your motherboard’s VGA LED is not illuminating:
- Faulty or Loose Video Card – The graphics card is not properly seated in the PCIe slot or has become partially dislodged. Reseating the card may fix connection issues.
- Improperly Connected Power to GPU – The 6/8-pin power connectors that provide power to the video card are loose or disconnected.
- Outdated BIOS – An obsolete motherboard BIOS version may lack support for newer graphics cards. A BIOS update can add compatibility.
- VGA Cable Issues – Damaged, bent or improperly connected VGA display cables will cause connection problems.
- Failed Graphics Card – If not impacted by the other factors, the GPU itself may be defective and need to be replaced.
- Disabled Integrated Graphics – Onboard integrated graphics may require a manual enable if you’re not using a discrete GPU.
- Monitor or Display Problems – Issues with the condition and settings of your display device can also prevent image display.
The good news is that in most cases, the culprit can be found through some diligent troubleshooting of potential VGA components.
How Can I Test My Monitor/Graphics Card Connection?
If you suspect an issue with the connection between your monitor and graphics card, here are a few things you can try to test it:
- Connect your monitor to another computer using the same cable. If the monitor works, the issue is likely with your graphics card or motherboard.
- Try a different monitor cable, like swapping between VGA, DVI, HDMI cables. Faulty cables cause problems.
- Boot into your computer’s BIOS. If you see a display, the graphics card and monitor are communicating at a basic level.
- Install a diagnostic software like GPU-Z and check it detects your graphics card properly.
- Try moving your graphics card to a different PCIe slot on your motherboard if possible.
- Remove all unnecessary peripherals and expansion cards to isolate the issue.
Running through these basic connection tests can help pinpoint where the breakdown in the display signal is occurring.
Step-By-Step Troubleshooting for a Non-Working VGA Light
Follow these steps to target the possible cause if your motherboard’s VGA LED is not turning on:
1. Check Your Graphics Card
The graphics card is the most likely component to cause VGA LED issues.
- Verify the card is fully seated in the PCIe slot. Carefully press down on it to confirm. Reseat if necessary.
- Inspect the gold contact pins for any damage or obscured pins. Bent pins can disrupt the connection.
- Check the 6/8-pin power connectors are firmly plugged into the card. Secure any loose connections.
- If card has multiple fans, ensure they are spinning upon bootup. Non-spinning fans often indicate GPU failure.
- Test your card in a different PCIe slot if available. Also try using it in another PC.
2. Check for Damage
Carefully examine both your monitor and graphics card for any signs of physical damage that could impede the video signal:
- Check monitor for cracked screen, bent connectors, frayed cables or overheating components.
- Remove graphics card and inspect for scorch marks, burnt out chips, popped capacitors, bent fins or fans not spinning.
- Examine the gold contact pins on the graphics card’s PCIe connector for any dirt, grease or obscured pins.
- Ensure the graphics card is fully seated. Remove and reseat the card if needed.
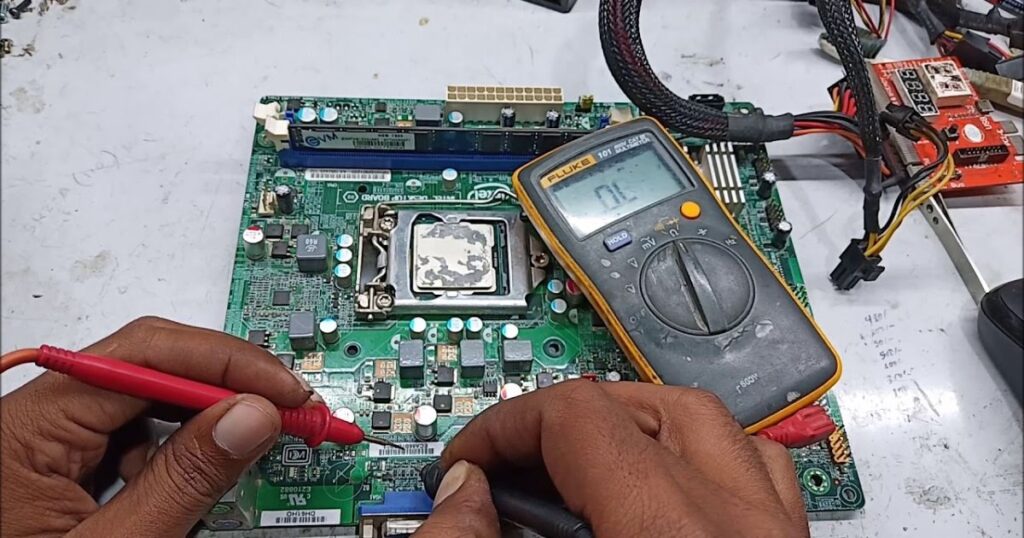
- Diagnostic software can detect GPU errors like memory defects, clock issues or overheating.
Any physical defects could lead to failure and disruption of the video feed. Replace damaged hardware components immediately.
3. Examine Connections and Cables
Issues with cables and connectors can easily disrupt the VGA signal:
- Ensure the VGA cable is undamaged and securely connected at both ends.
- Try swapping in a different VGA cable if you have one available. Faulty cables do occur.
- Check that all internal motherboard power connections are fully inserted.
- Verify all PCIe power connectors into the GPU are snapped in all the way.
4. Update Drivers and BIOS
Outdated software often creates compatibility issues:
- Update your GPU drivers directly from Nvidia or AMD’s website. An obsolete driver can cause problems.
- Go to your motherboard manufacturer’s website and check for a newer BIOS version. Flash the BIOS if needed.
- Update your motherboard chipset drivers as well for optimal performance.
5. Confirm Monitor and Display Are Functional
Monitor and display connection issues can also lead to a blank screen:
- Try connecting your display to another PC or laptop. Verify the monitor and cables work properly.
- If using a TV as a display, confirm the correct input channel is selected. Switch to the proper HDMI input.
- Reset your monitor’s settings to default in case incorrect display settings are causing the blank out.
- Ensure your monitor is powered on before boot up. Turn off with PC, not at wall.
6. Test with Integrated Graphics
If possible, connecting to integrated graphics can verify a GPU-related failure:
- Remove your dedicated graphics card fully from the PCIe slot.
- Connect your monitor directly to the motherboard’s integrated HDMI or VGA output.
- Boot up your PC and see if you get a signal now using the CPU’s integrated graphics.
- If the integrated graphics work, it points to a faulty dedicated GPU as the probable cause.
7. Replace Defective Hardware
If you’ve narrowed down the issue, you may need to replace faulty components:
- If confirmed to be graphics card failure, you will need to replace the defective GPU.
- Swap out damaged or under-spec VGA cables. Use only VGA cables rated for high resolution.
- Replace the motherboard if issue is traced to damaged PCIe slot or ports.
Following these steps methodically can aid in identifying precisely what hardware issue is preventing your motherboard’s VGA LED from turning on properly.
Preventing VGA Problems
Here are some tips to help avoid a dead VGA LED in the future:
- Handle GPUs carefully – Don’t flex or bend cards to prevent damage to PCIe connectors. Keep protected in an antistatic bag.
- Keep graphics drivers updated – Update to latest drivers to maintain compatibility and performance.
- Visually inspect hardware – Check for any cracked solder joints or burnt components on cards.
- Reseat components periodically – Reseating fittings like DIMMs can prevent loose connections over time.
- Ensure proper airflow – Keep vents and fans clear of dust buildup for adequate cooling.
- Replace failing hardware – Don’t overlook warning signs of components nearing end of life.
- Use high quality cables – Cheap cables tend to deteriorate faster leading to breakage.
Following basic maintenance practices for your PC components can minimize the chances of a dead VGA LED in the future.
Getting Your VGA Light Functioning Again
That covers the common reasons why your motherboard’s VGA LED may not be turning on and the steps to troubleshoot the issue. With some diligent testing and component replacement if needed, you should be able to get the light working again and your video signal restored.
If problems persist after trying all standard troubleshooting, you may need more advanced diagnostics. Reach out to the component manufacturer or consider seeking help from a professional computer repair technician if you can’t get the VGA LED operational again yourself. But in most cases, a bit of patience and testing will uncover the graphics failure.
What Does the White VGA Light on My Asus Motherboard Mean?
For Asus motherboards, a solid white VGA LED indicates the system has passed the integrated graphics initialization stage during the POST process.
However, on some Asus models a persistently illuminated white light points to a potential integrated graphics failure.
If you are not getting any video output:
- Try removing extra PCIe cards and booting with just the integrated graphics enabled.
- Verify the integrated graphics drivers are installed and up to date.
- Clear CMOS to reset BIOS settings in case they are interfering.
- Confirm monitor cables are connected properly to integrated output ports.
If white VGA LED stays on, integrated graphics may be faulty and require motherboard replacement. Contact Asus support for further troubleshooting.
What Does the White VGA Light Mean?
Generally, a white VGA LED on a motherboard signifies that the VGA graphics are being initialized correctly.
Here are some common meanings for a white VGA light:
- Solid On – Graphics card detected, VGA initialized properly at boot.
- Flashing – Indicates a problem with VGA detection like a loose graphics card.
- On But No Display – Points to monitor/cable connection issue usually.
- Never On – Motherboard cannot detect graphics card installed.
- Blinking at Boot Only – VGA initialized but problem during boot process.
- LED Stuck On – Potential motherboard VGA port failure.
So a solid white light is good while a blinking or stuck on light typically means troubleshooting is required. Check connections first.
What to Do When Your Motherboard VGA Light is On But Your GPU Works?
If your motherboard’s VGA light illuminates normally but your dedicated GPU isn’t sending a display signal, try these steps:
- Confirm your monitor is connected to the GPU outputs, not motherboard ports.
- Reseat the graphics card in the PCIe slot, press down firmly.
- Check for loose power connectors to the GPU.
- Disable integrated graphics in BIOS if they conflict with your dedicated card.
- Update graphics card drivers and motherboard BIOS to latest available.
- Clear CMOS to reset BIOS settings that may interfere.
- Test GPU in a different system if possible to isolate issue.
Usually a motherboard VGA light on but no display points to connectivity problem between GPU and monitor. Troubleshoot cables, connections and component seating first.
Troubleshooting the VGA Light on a Gigabyte Motherboard
For troubleshooting a blank VGA LED on a Gigabyte motherboard, follow these steps:
- Reseat the graphics card in the PCIe slot and press down to verify full contact.
- Inspect socket pins for any dirt, grease or damage. Bent pins can disrupt connection.
- Try graphics card in a different PCIe slot if available.
- Check all motherboard and GPU power connectors are firmly plugged in.
- Clear CMOS and reset BIOS to default settings. An incorrect setting may interfere.
- If card has multiple fans, check that all are spinning properly during boot.
- If using integrated graphics, verify cable is connected to motherboard video output.
- Attempt boot with just one stick of RAM installed, try each stick individually.
- Update to latest motherboard BIOS, chipset and graphics drivers from Gigabyte.
- If the light never illuminates, the graphics card itself is likely defective and needs replacement.
Following Gigabyte’s troubleshooting and diagnostic steps can help narrow down the cause of a non-working VGA LED. Contact their tech support if issues persist.
Seeing the VGA light turn on when starting up your computer is a reassuring sign that your graphics card and display are working properly. However, if this LED indicator on your motherboard doesn’t light up, it likely signals an underlying issue with the VGA (video graphics array) system. In this comprehensive guide, we’ll cover everything you need to know about troubleshooting a motherboard’s VGA light to get your display back up and running again.
What the VGA Light Signals
The VGA light is a light-emitting diode (LED) located on the motherboard that illuminates during the power-on self-test (POST) when booting up the computer. It indicates that the motherboard has detected a graphics card or video card installed and has initialized the VGA graphics system.
Here’s a quick rundown of what the VGA light signifies:
- On – The motherboard has detected the graphics card and initialized the VGA system correctly. The display should turn on.
- Off – The motherboard cannot detect the graphics card. There will be no video signal sent to the display.
- Flashing – Usually indicates a problem with initializing the graphics card or a system hardware error.
Having the VGA LED light up is the first step towards getting video output to your display. If it doesn’t turn on, the motherboard and graphics card aren’t communicating properly.
Why the VGA Light Matters
This small LED provides valuable diagnostic information for your PC. Here are some key reasons why a functioning VGA system is important:
- Video Signal – The VGA LED verifies that a video signal is being sent from the motherboard’s PCIe slot to your graphics card and display. Without this initialization, you’ll have no image.
- Hardware Detection – It confirms that the motherboard recognizes the graphics card. The VGA system must detect hardware like the GPU for video output.
- Boot Process – Illuminating the LED signifies the boot process has passed the VGA initialization stage. Issues may prevent POST from completing.
- Graphics Card Health – If the light flickers or won’t turn on, it often indicates a problem with your graphics card that needs to be addressed.
- Troubleshooting – It’s an early troubleshooting checkpoint. If the light doesn’t come on, focus your efforts on the VGA components.
So in summary, this essential LED light acts as both a status indicator and a diagnostic tool for the graphics card and video connectivity of your PC. When the VGA light doesn’t turn on, it should prompt further investigation.
Common Reasons the VGA Light May Not Be Working
There are a handful of potential culprits if your motherboard’s VGA LED is not illuminating:
- Faulty or Loose Video Card – The graphics card is not properly seated in the PCIe slot or has become partially dislodged. Reseating the card may fix connection issues.
- Improperly Connected Power to GPU – The 6/8-pin power connectors that provide power to the video card are loose or disconnected.
- Outdated BIOS – An obsolete motherboard BIOS version may lack support for newer graphics cards. A BIOS update can add compatibility.
- VGA Cable Issues – Damaged, bent or improperly connected VGA display cables will cause connection problems.
- Failed Graphics Card – If not impacted by the other factors, the GPU itself may be defective and need to be replaced.
- Disabled Integrated Graphics – Onboard integrated graphics may require a manual enable if you’re not using a discrete GPU.
- Monitor or Display Problems – Issues with the condition and settings of your display device can also prevent image display.
The good news is that in most cases, the culprit can be found through some diligent troubleshooting of potential VGA components.
How Can I Test My Monitor/Graphics Card Connection?
If you suspect an issue with the connection between your monitor and graphics card, here are a few things you can try to test it:
- Connect your monitor to another computer using the same cable. If the monitor works, the issue is likely with your graphics card or motherboard.
- Try a different monitor cable, like swapping between VGA, DVI, HDMI cables. Faulty cables cause problems.
- Boot into your computer’s BIOS. If you see a display, the graphics card and monitor are communicating at a basic level.
- Install a diagnostic software like GPU-Z and check it detects your graphics card properly.
- Try moving your graphics card to a different PCIe slot on your motherboard if possible.
- Remove all unnecessary peripherals and expansion cards to isolate the issue.
Running through these basic connection tests can help pinpoint where the breakdown in the display signal is occurring.
Step-By-Step Troubleshooting for a Non-Working VGA Light
Follow these steps to target the possible cause if your motherboard’s VGA LED is not turning on:
1. Check Your Graphics Card
The graphics card is the most likely component to cause VGA LED issues.
- Verify the card is fully seated in the PCIe slot. Carefully press down on it to confirm. Reseat if necessary.
- Inspect the gold contact pins for any damage or obscured pins. Bent pins can disrupt the connection.
- Check the 6/8-pin power connectors are firmly plugged into the card. Secure any loose connections.
- If card has multiple fans, ensure they are spinning upon bootup. Non-spinning fans often indicate GPU failure.
- Test your card in a different PCIe slot if available. Also try using it in another PC.
2. Check for Damage
Carefully examine both your monitor and graphics card for any signs of physical damage that could impede the video signal:
- Check monitor for cracked screen, bent connectors, frayed cables or overheating components.
- Remove graphics card and inspect for scorch marks, burnt out chips, popped capacitors, bent fins or fans not spinning.
- Examine the gold contact pins on the graphics card’s PCIe connector for any dirt, grease or obscured pins.
- Ensure the graphics card is fully seated. Remove and reseat the card if needed.
- Diagnostic software can detect GPU errors like memory defects, clock issues or overheating.
Any physical defects could lead to failure and disruption of the video feed. Replace damaged hardware components immediately.
3. Examine Connections and Cables
Issues with cables and connectors can easily disrupt the VGA signal:
- Ensure the VGA cable is undamaged and securely connected at both ends.
- Try swapping in a different VGA cable if you have one available. Faulty cables do occur.
- Check that all internal motherboard power connections are fully inserted.
- Verify all PCIe power connectors into the GPU are snapped in all the way.
4. Update Drivers and BIOS
Outdated software often creates compatibility issues:
- Update your GPU drivers directly from Nvidia or AMD’s website. An obsolete driver can cause problems.
- Go to your motherboard manufacturer’s website and check for a newer BIOS version. Flash the BIOS if needed.
- Update your motherboard chipset drivers as well for optimal performance.
5. Confirm Monitor and Display Are Functional
Monitor and display connection issues can also lead to a blank screen:
- Try connecting your display to another PC or laptop. Verify the monitor and cables work properly.
- If using a TV as a display, confirm the correct input channel is selected. Switch to the proper HDMI input.
- Reset your monitor’s settings to default in case incorrect display settings are causing the blank out.
- Ensure your monitor is powered on before boot up. Turn off with PC, not at wall.
6. Test with Integrated Graphics
If possible, connecting to integrated graphics can verify a GPU-related failure:
- Remove your dedicated graphics card fully from the PCIe slot.
- Connect your monitor directly to the motherboard’s integrated HDMI or VGA output.
- Boot up your PC and see if you get a signal now using the CPU’s integrated graphics.
- If the integrated graphics work, it points to a faulty dedicated GPU as the probable cause.
7. Replace Defective Hardware
If you’ve narrowed down the issue, you may need to replace faulty components:
- If confirmed to be graphics card failure, you will need to replace the defective GPU.
- Swap out damaged or under-spec VGA cables. Use only VGA cables rated for high resolution.
- Replace the motherboard if issue is traced to damaged PCIe slot or ports.
Following these steps methodically can aid in identifying precisely what hardware issue is preventing your motherboard’s VGA LED from turning on properly.
Preventing VGA Problems
Here are some tips to help avoid a dead VGA LED in the future:
- Handle GPUs carefully – Don’t flex or bend cards to prevent damage to PCIe connectors. Keep protected in an antistatic bag.
- Keep graphics drivers updated – Update to latest drivers to maintain compatibility and performance.
- Visually inspect hardware – Check for any cracked solder joints or burnt components on cards.
- Reseat components periodically – Reseating fittings like DIMMs can prevent loose connections over time.
- Ensure proper airflow – Keep vents and fans clear of dust buildup for adequate cooling.
- Replace failing hardware – Don’t overlook warning signs of components nearing end of life.
- Use high quality cables – Cheap cables tend to deteriorate faster leading to breakage.
Following basic maintenance practices for your PC components can minimize the chances of a dead VGA LED in the future.
Getting Your VGA Light Functioning Again
That covers the common reasons why your motherboard’s VGA LED may not be turning on and the steps to troubleshoot the issue. With some diligent testing and component replacement if needed, you should be able to get the light working again and your video signal restored.
If problems persist after trying all standard troubleshooting, you may need more advanced diagnostics. Reach out to the component manufacturer or consider seeking help from a professional computer repair technician if you can’t get the VGA LED operational again yourself. But in most cases, a bit of patience and testing will uncover the graphics failure.
What Does the White VGA Light on My Asus Motherboard Mean?
For Asus motherboards, a solid white VGA LED indicates the system has passed the integrated graphics initialization stage during the POST process.
However, on some Asus models a persistently illuminated white light points to a potential integrated graphics failure.
If you are not getting any video output:
- Try removing extra PCIe cards and booting with just the integrated graphics enabled.
- Verify the integrated graphics drivers are installed and up to date.
- Clear CMOS to reset BIOS settings in case they are interfering.
- Confirm monitor cables are connected properly to integrated output ports.
If white VGA LED stays on, integrated graphics may be faulty and require motherboard replacement. Contact Asus support for further troubleshooting.
What Does the White VGA Light Mean?
Generally, a white VGA LED on a motherboard signifies that the VGA graphics are being initialized correctly.
Here are some common meanings for a white VGA light:
- Solid On – Graphics card detected, VGA initialized properly at boot.
- Flashing – Indicates a problem with VGA detection like a loose graphics card.
- On But No Display – Points to monitor/cable connection issue usually.
- Never On – Motherboard cannot detect graphics card installed.
- Blinking at Boot Only – VGA initialized but problem during boot process.
- LED Stuck On – Potential motherboard VGA port failure.
So a solid white light is good while a blinking or stuck on light typically means troubleshooting is required. Check connections first.
What to Do When Your Motherboard VGA Light is On But Your GPU Works?
If your motherboard’s VGA light illuminates normally but your dedicated GPU isn’t sending a display signal, try these steps:
- Confirm your monitor is connected to the GPU outputs, not motherboard ports.
- Reseat the graphics card in the PCIe slot, press down firmly.
- Check for loose power connectors to the GPU.
- Disable integrated graphics in BIOS if they conflict with your dedicated card.
- Update graphics card drivers and motherboard BIOS to latest available.
- Clear CMOS to reset BIOS settings that may interfere.
- Test GPU in a different system if possible to isolate issue.
Usually a motherboard VGA light on but no display points to connectivity problem between GPU and monitor. Troubleshoot cables, connections and component seating first.
Troubleshooting the VGA Light on a Gigabyte Motherboard
For troubleshooting a blank VGA LED on a Gigabyte motherboard, follow these steps:
- Reseat the graphics card in the PCIe slot and press down to verify full contact.
- Inspect socket pins for any dirt, grease or damage. Bent pins can disrupt connection.
- Try graphics card in a different PCIe slot if available.
- Check all motherboard and GPU power connectors are firmly plugged in.
- Clear CMOS and reset BIOS to default settings. An incorrect setting may interfere.
- If card has multiple fans, check that all are spinning properly during boot.
- If using integrated graphics, verify cable is connected to motherboard video output.
- Attempt boot with just one stick of RAM installed, try each stick individually.
- Update to latest motherboard BIOS, chipset and graphics drivers from Gigabyte.
- If the light never illuminates, the graphics card itself is likely defective and needs replacement.
Following Gigabyte’s troubleshooting and diagnostic steps can help narrow down the cause of a non-working VGA LED. Contact their tech support if issues persist.

Brook over 3 years of professional gaming, esports coaching, and gaming hardware reviews to provide insightful expertise across PC, console, and mobile gaming.